Long before the dawn of the pumpkin spice latte, there were pumpkin desserts that were only consumable with a fork or spoon.
The French and English were the first to create pumpkin desserts in the 17th century. They hollowed out a pumpkin, poured in a sweet, creamy mixture of milk and honey. and cooked it over hot coals. The result was a creamy custardy pudding on a pumpkin base. Historical references to “French and English” may suggest that the earliest pumpkin desserts were likely to be Canadian, rather than something created by the first Pilgrims, as is often portrayed.
Using pumpkins imported from America, pumpkin desserts evolved over time becoming more like the torte, created by François Pierre La Varenne in 1651, that added a pastry crust.
Amelia Simmons’s created the version we are so familiar with today, and published it in her 1796 cookbook, “American Cookery”. Today, pumpkin pie is so popular that an estimated 50 million are eaten on US Thanksgiving.
My family has a varied history with pumpkin pies; having been avid consumers of both the classic American version, and my mother’s chiffon version. More recently, we have introduced a vegan version. In spite of the egg-less swap for coconut milk, it were deemed as tasty as the original by our guests. Our one experiment with pumpkin cheesecake was a sad failure. Not because it wasn’t tasty, it was. It simply was not what we expected on Thanksgiving.
Pumpkin pie is so loved in our family that making anything less than two is likely to result in moans and groans when 2nd and 3rd slices are inevitably requested and unavailable. I recall one Thanksgiving when my mother actually prepared three pies, telling us there were only two (which had already been fully consumed), and refusing to release the third when it was discovered tucked in the back of the fridge. Mom and Dad had been saving it for themselves. I am pretty sure I randomly stopped by the next day in order to score just one more slice.
Pumpkin Pie – Two Ways
There has been long-standing debate in the family as to which is better: the Chiffon version, made popular by my Mother, or the ubiquitous “Classic”. Personally, I am happy with either, though the Classic version is a bit simpler as the pie shell and filling cook together in a single bake while the Chiffon version is a two step process requiring a blind-baked shell, separate from the filling prep.
This year we all participated in a pumpkin pie tasting. I baked one Chiffon pumpkin pie, using my mother’s hand-written recipe, and two Classic pumpkin pies using my own recipe. It probably originated in a cookbook somewhere, but has evolved over time as I have made it my own. I just know how to make it now – no need to look anything up.
This was the year. After a delicious meal, assembled by the entire family, we staged a Thanksgiving taste test: Mom’s Chiffon pumpkin pie versus my Classic. Most of us had a slice of each in order to provide a fair comparison. Once the votes were tallied, the Chiffon version won handily with 10 of the 12 votes. I had also cast my vote for the Chiffon version; no offense taken.
Here are the recipes for both. Feel free to try your own taste test. The Chiffon pumpkin pie is worth the small amount of extra effort. Kudos Mom!
Pumpkin Pie Filling – “The Classic“
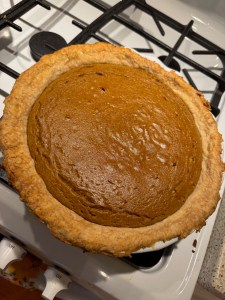
This recipe makes one pie which can serve 1-8 pumpkin pie lovers. – depending on how hearty their appetite and how strong their desire for leftovers.
- 1 pie shell (I have noted my mother’s all purpose pastry recipe below, use your own o r even a store-bought one will do the trick)
- 1 398 ml (15 oz) can of pumpkin puree
Do not use pumpkin pie filling. I did that accidentally once and it was inedible – probably due to the massive overdose of sugar. I have also made the pumpkin puree myself, but it is a lot of extra work for little flavour impact. Hats off to you if that’s the route you take. - 3 large eggs
- 3/4 c lightly packed brown sugar
- 3/4 c heavy cream
- 1/2 c whole milk
- 1 generous tbsp cornstarch
- 1 1/2 tsp ground cinnamon
- 1/2 tsp ground ginger
- 1/4 tsp ground cloves
- 1/4 tsp allspice
- 1/4 tsp ground nutmeg
- 1/4 tsp salt
- Prepare the crust. Refrigerate for at least 30 minutes before filling.
- Preheat oven to 375 °F.
- In a large bowl or blender, combine the pumpkin puree, eggs, brown sugar, heavy cream and milk. Blend until smooth.
- Add the cornstarch, cinnamon, ginger, cloves, allspice, nutmeg and salt. Blend again until well combined, ensuring there are no clumps remaining.
- Pour the filling into the unbaked pie crust and bake at 375° for 40-55 minutes. Check the pie around the 30 minute mark and use a pie shield or tinfoil to protect the pastry edges from over-browning.
- The pie is done when the centre of the pie still has a little bit of jiggle; it will solidify as the pie cools. Over-baking can result in cracks in the filling, easily covered with an extra dose of whip cream.
- Cool on a rack for 3 hours then store in the fridge overnight if time permits. It allows the flavours to develop.
- Serve with a bowl (or can) of whip cream and allow guests to apply their desired quantity.
Pumpkin Chiffon Pie
This recipe was my Mother’s favourite. Although we grew up with the more traditional baked pumpkin pie, this was the version most likely to appear on our Thanksgiving table. It is light and fluffy after a heavy meal, though slightly more effort to prepare. If you are making multiple pies, the filling is best prepared one a time versus doubling the recipe.
- 1 pie crust (blind-baked)
- 1 envelope (2 1/2 tsp) unflavoured gelatin
- 1/4 c water
- 3/4 c granulated sugar (divided)
- 1/2 tsp salt
- 1 tsp ground cinnamon
- 1/2 tsp ground allspice
- 1/4 tsp ground nutmeg
- 1/4 tsp ground cloves
- 3 large eggs, separated
- 1/2 c whole milk
- 1 398 ml (15 oz) can of pumpkin puree
- 1 tsp vanilla extract
- Preheat oven to 375 °F
- Prepare to blind bake your pie crust. Poke some holes in the crust with a fork and use pie weights. Dried beans on a piece of parchment paper will also do the job if you don’t have pie weights. (This was my mother’s cost effective solution. Her “used” beans were kept in a labelled jar, having been baked in a pie shell more times than I can count. They were still in her kitchen pantry when she passed away.)
- Bake the pie shell at 375° for 10 minutes, then remove the weights and bake another 10 minutes. If the edges start to over-brown you can use a shield or foil for protection during the final stage. (I have over-browned several pie shells by losing focus and wandering off to another task. I urge you to keep a close watch, especially during the second stage of baking.)
- Dissolve the gelatin by sprinkling it over the water in a small bowl. Let is sit for at least 5 minutes.
- Combine 1/2 c of the sugar, salt, cinnamon, allspice, nutmeg, cloves, egg yolks, milk and pumpkin in a saucepan. Whisk well and cook, stirring frequently for 5-10 minutes. It should be hot and slightly thickened. Do not allow it to boil.
- Remove the pumpkin mixture from the heat. Stir in the gelatin and the vanilla. Then let it sit and cool to room temperature. Do not put it in the fridge as it will begin to set too soon.
- Once cooled, beat the egg whites to soft peaks. Continue beating, until stiff peaks form, while gradually adding 1/4 c of the sugar.
- Gently fold the beaten egg whites into the cooled pumpkin mixture, then pour into the cooled pie shell.
- Refrigerate at least 4 hours before serving to allow the filling to set.
Be careful when cutting this pie as it is quite delicate. I like to make sure the first piece I cut is a decent size as retrieving a 1″ wide slice first is fraught with challenges. I personally think the Chiffon version does not require the whip cream topping, but each to their own!
A final note: if you are a little squeamish about using raw egg whites, you can substitute pasteurized egg whites, or lightly sweetened whip cream.
Never Fail Pastry

This recipe, as written, makes enough pastry for 3 double crust pies. That is indeed a lot of pastry, though rarely an issue as any unused pastry can be stored in the freezer for up to 3 months for a future pie. Or it can be used for other purposes such as sausage roles, cheese straws, quiche or meat pasties. There are some notes on the the first two options below.
This recipe creates a very flaky pie crust, even if you handle it a fair bit.
The original version calls for shortening, particularly helpful if you want a vegan recipe. My husband is definitely a butter crust fan, though I find somewhat unforgiving and prone to tearing. The best solution seems to be a mix of both resulting in a crust that is flaky and easy to handle.
- 4 c. all purpose flour
- 1 tsp baking powder
- 1 tbsp sugar (can be omitted if the pastry is to be used for something savoury)
- 1 tsp salt
- 1 3/4 c shortening or 3/4 c butter, or 1 c butter and 3/4 c shortening combined
- 1 egg
- 1/2 c water
- 1 tsp vinegar
- Combine dry ingredients.
- Cut in shortening/butter. I have always done this by feel, as my mother taught me. It should end up feeling like small peas, floating about in the flour.
- Beat egg slightly with the water and add the vinegar.
- Pour the liquid into the flour & shortening mix. Add more flour in small amounts if resulting pastry seems too moist, or small amounts of cold water if it is too dry.
- Divide and chill for one hour before rolling out on floured board.
Cheese Sticks
Leftover pastry can be put to good use by mixing in some shredded cheddar; amounts are completely subjective. Consider the amount of leftover pastry and how cheesy you like your snacks; this is not the time to be too conservative.
Roll a rectangle or any size as long as it is about 3/4” thick. Make thin slices lengthwise, about 3/4″ wide, and twist them (or not). Bake on a sheet at 375 °F for 10-15 minutes. Voila! Cheese straws.
Sausage Rolls

Who does not love wandering through the kitchen and snagging a one or two bite sausage roll then stuffing it in your mouth as you keep walking? They have always been popular in our family. Mom would make dozens of them to distribute to each of us as part of her Christmas baking. While my brother and brother-in-law were the biggest fans, we have all managed to scarf down our fair share over the years.
Having said that, I have generally saved myself for homemade mincemeat tarts, which make a rare appearance at the holidays. Come to think of it… I am old enough to make my own decisions and make mincemeat tarts whenever I please… except I cannot leave them alone so consumption needs to be carefully managed.
This recipe is more of a suggestion than an actual recipe. It is easy to flex the sausage filling to your personal preferences: mild, bold, spicy! I am going to describe the basics here. Frankly, this is not unlike a number of my mother’s recipes which could be easily flexed for leftovers, whatever was in the fridge and her general mood.
- 1 lb of ground sausage meat, any type, though pork is the base case
- 1 large shallot, (or 1/2 small onion) diced small or 2 tablespoons of dried onion
- spices, use the ones you like best though here are my personal choices, all about 1 tsp each: dried marjoram (a highly under-rated spice that my mother used often), dried thyme, paprika, garlic powder (or 2 small cloves of garlic crushed.) I also like tarragon, especially with ground chicken or turkey.
- 1/2 tsp salt
- 1/2 tsp pepper
- pastry for two pie shells or 1 package of thawed puff pastry
- 1 beaten egg (for an egg wash)
- Sesame or poppy seeds to sprinkle on top, though I rarely bother with this step
- Preheat oven to 400 °F and line 2 baking sheets with parchment paper or silicon liners.
- Mix the sausage, onion and spices in a bowl.
- Roll out 1/2 of the pastry at a time into two rectangles (about 14″x8″), then cut that in half down the middle lengthwise to get four 14″ x 4″ sections.
- Assemble the rolls by dividing the sausage into 4 portions, Shape each into a log down the centre of each pastry strip. Fold the edges over and pinch together. Cut each log into sections; I usually do 2″ but less or more is fine.
- Place rolls on the baking sheets, join down, brush with egg wash, and sprinkle with seeds if using.
- Bake 22-25 minutes until pastry is golden and sausage is fully cooked.
- Cool slightly on the pan, then on a wire rack before serving.
- They can be stored in the fridge in an airtight container for a few days, though they rarely last long.
Dipping sauce is an option ,though I can’t say I bother with this normally. Spicy mustard, ketchup or horseradish sauce would be good starting places.
Note: This blog post came about when my family began to ask what had happened to all of Grammy’s recipes. She was an adventurous cook and baker. Most of what she did was by taste, touch, and appearance so getting a good set of measurements was often a challenge. Over the years I learned to cook her way, though she did make an effort to measure and document some of our favourites, as have I. My hope is that this is the beginning of our family (and friends) cookbook that I imagine will take some time to pull together. It, like my mother’s cooking, will be a labour of love.


Leave a comment